Custom IQ packet report settings and Admin custom IQ packet report settings screens
This topic provides an overview of the Custom IQ packet report settings and Admin custom IQ packet report settings screens and all the settings and buttons on them. However if you require a step-by-step procedure on creating your own IQ packet configurations refer to Configuring the appearance of your IQ packet, or if you want a description of what is included in each section refer to Understanding each IQ packet. For administrators creating global IQ packet configurations refer to Creating global IQ packets.
NOTE: This screen requires option E15 IQ Packets Reports. If you do not have this option this screen is not available.
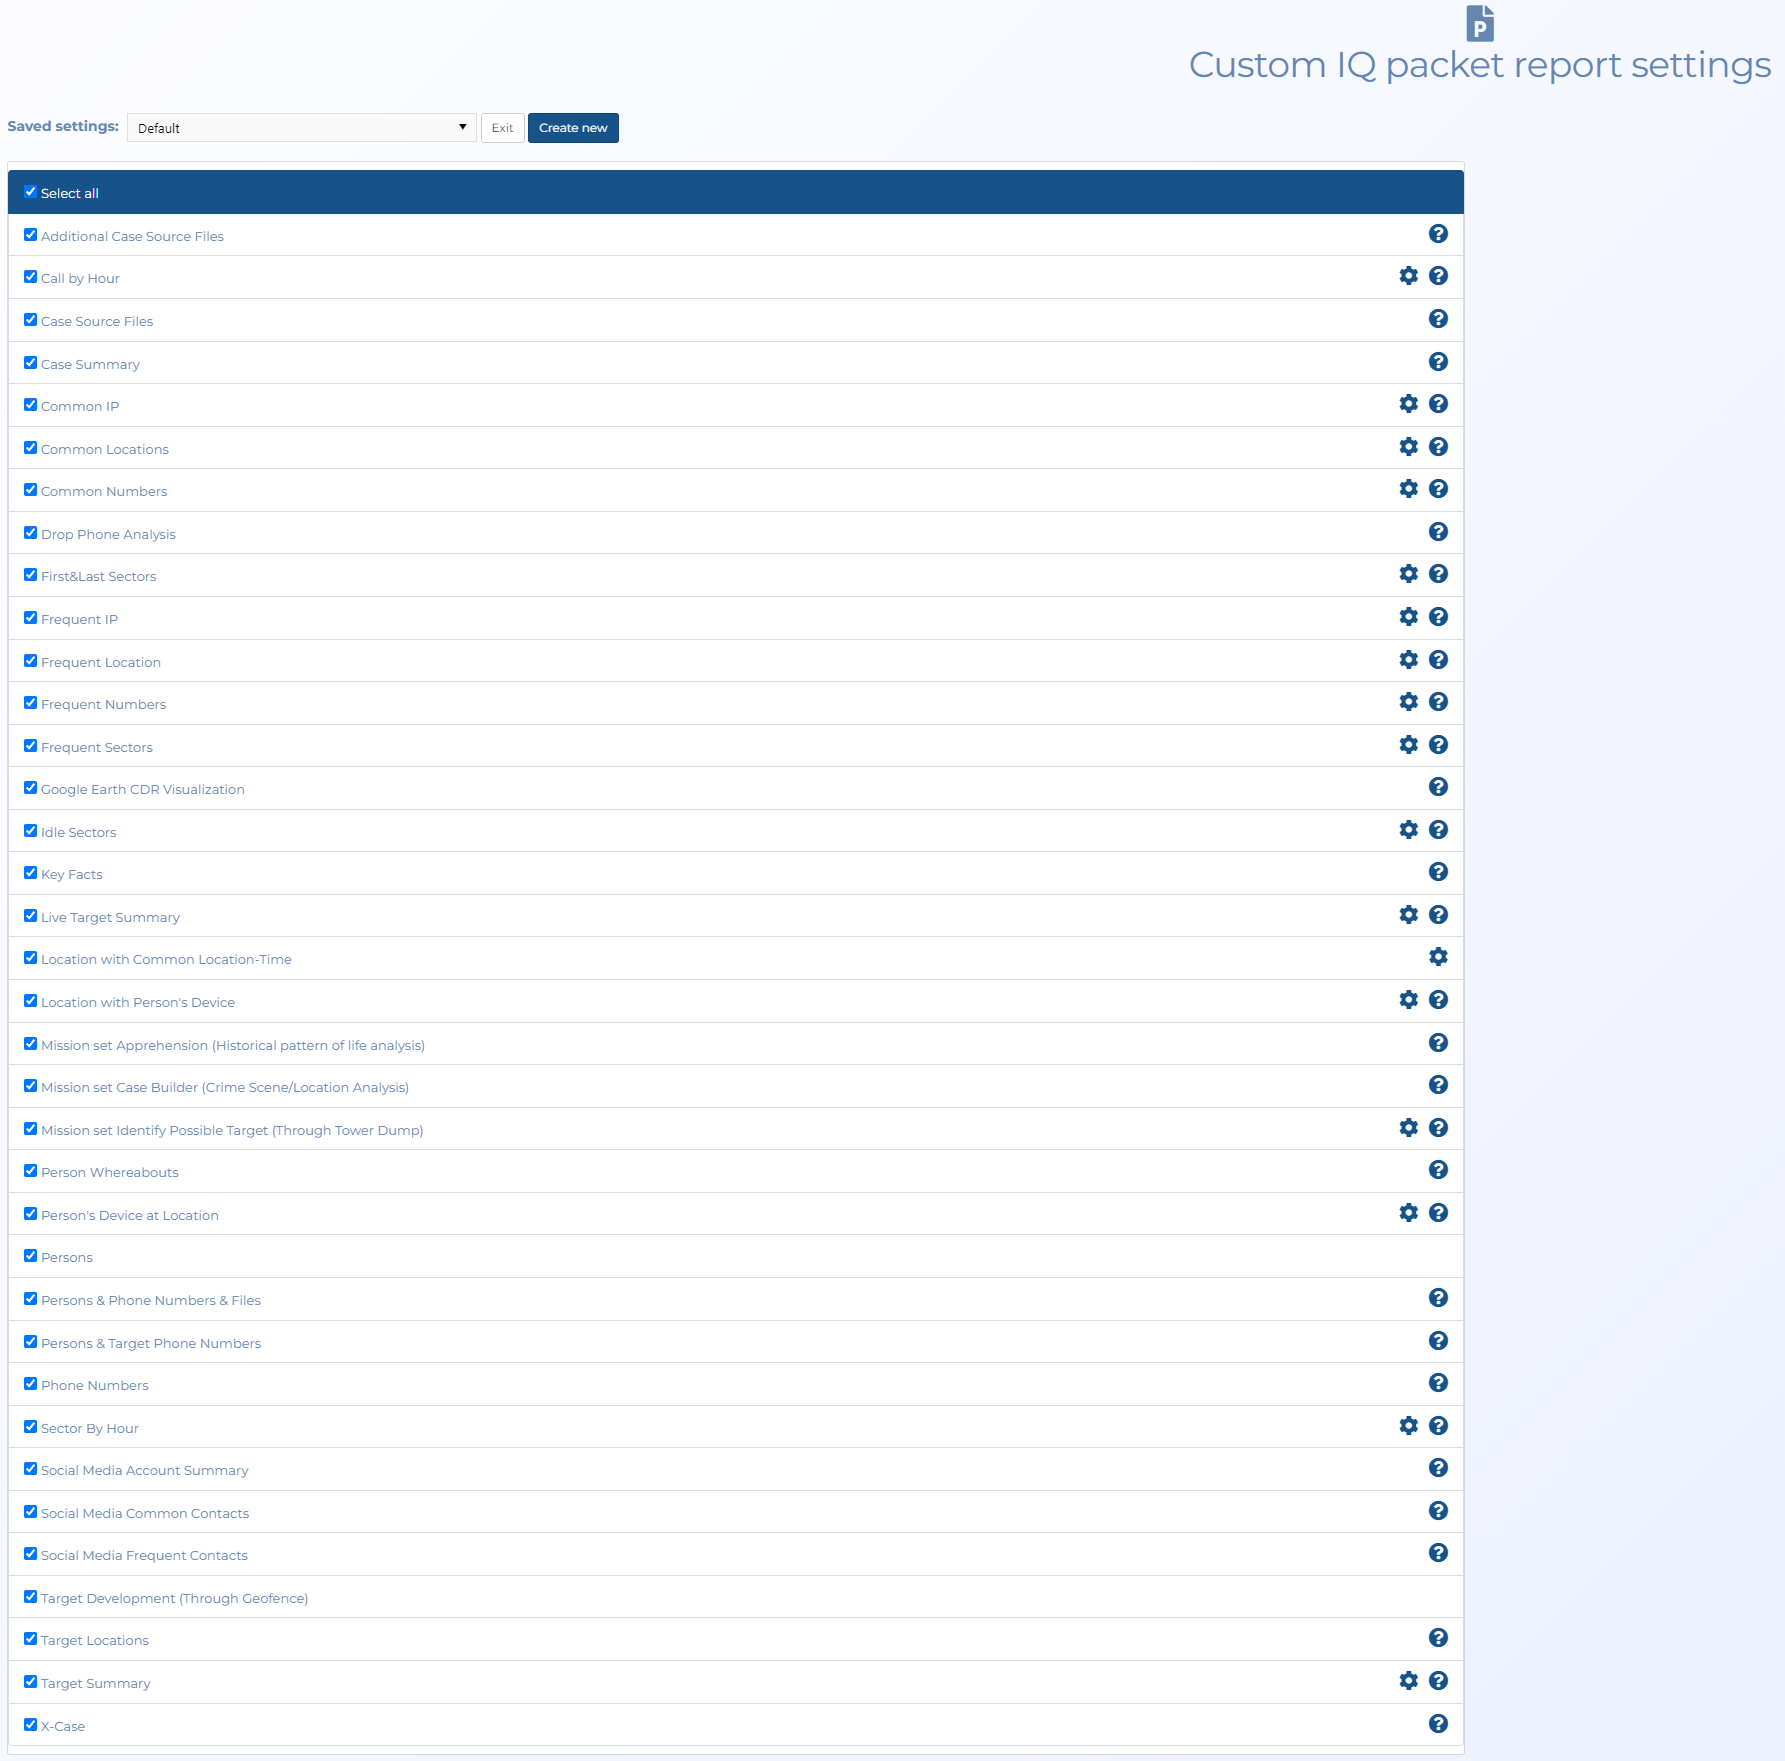
The Custom IQ packet report settings screen allows all users to view what content will be included in the IQ packet configurations supplied by Gladiator Forensics and it allows you to create, name and delete your own IQ packet configurations.
The outputs available for you to select is determined by your system administrator.
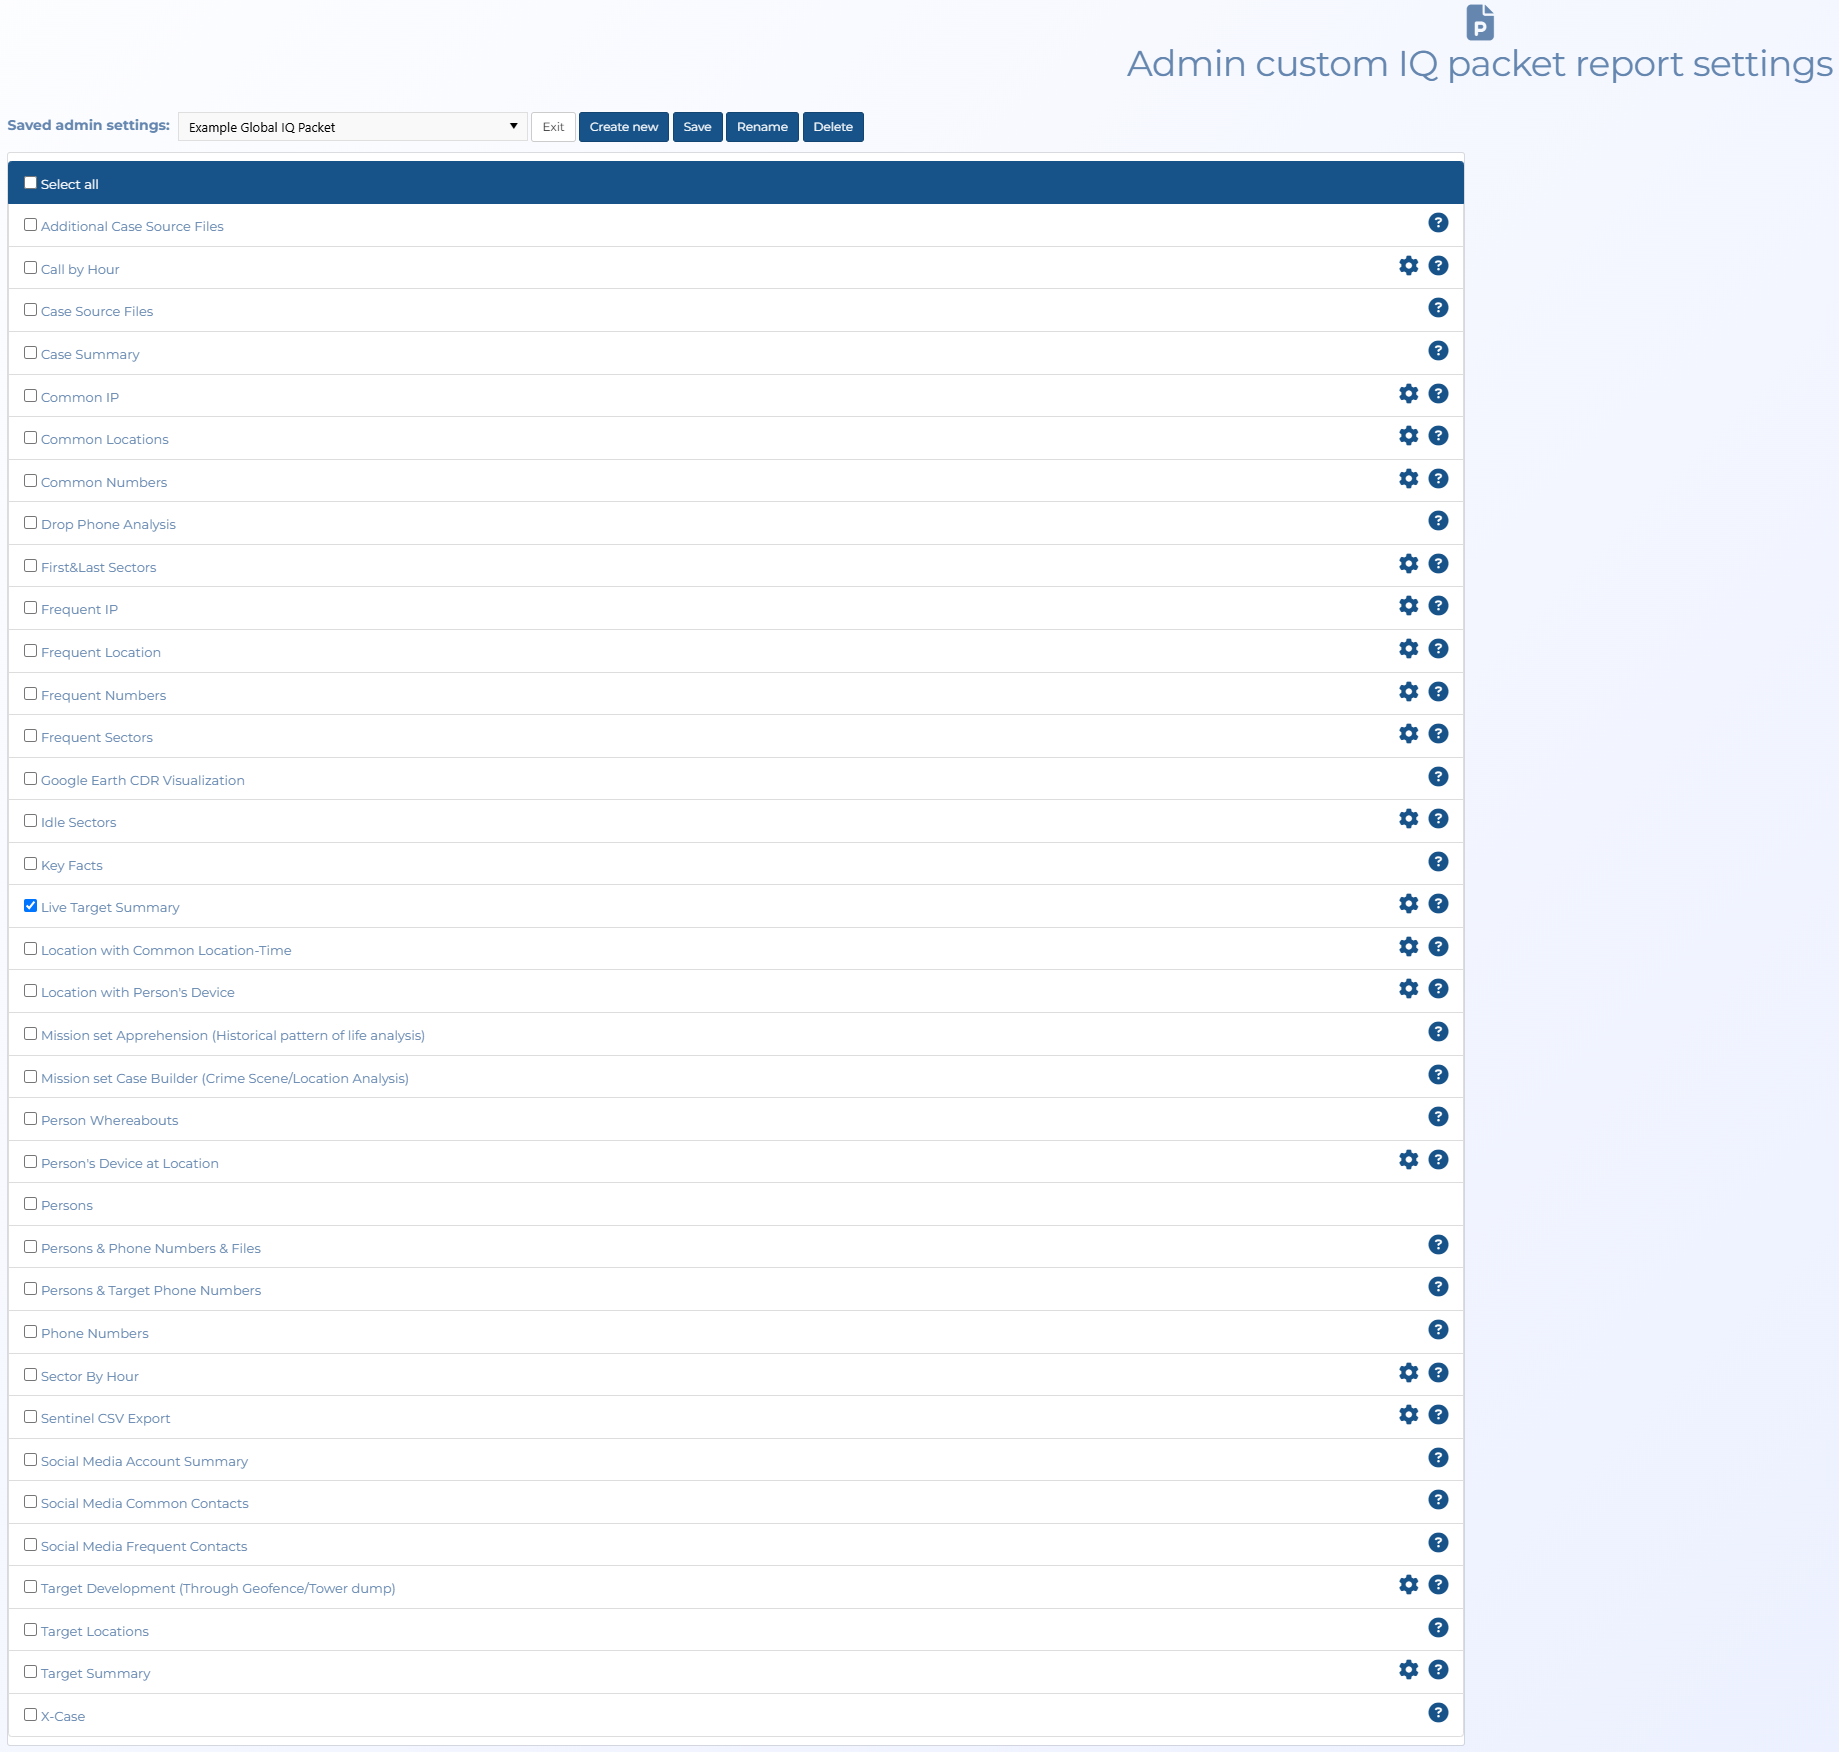
The Admin custom IQ packet report settings screen is only available to administrators and allows them to create global IQ packet configurations which are then available to all account users to select. All global configurations are displayed with a (Global) suffix in Custom IQ packet settings on the New IQ packet screen.

The Custom IQ packet report settings and Admin custom IQ packet report settings screens are shown below:
For further information on IQ packets refer to Using IQ packets.
Select which IQ packet configuration you want to view the contents for or that you want to manage.
For the IQ packet configurations:
- supplied by Gladiator Forensics you can only view the selected contents, you cannot change and save the selected contents of the IQ packet configuration using the same name supplied by Gladiator Forensics. However you can use Create new to create your own IQ packet configuration.
- you created you can edit the selected contents in IQ Packet contents list then save them. You can also rename and delete your IQ packet configurations.
This is only available if Saved settings is set to one of your own IQ packet configurations and not one of the configurations supplied by Gladiator Forensics. Click to save any changes you have made to the items that you currently have selected in IQ Packet contents list.
Click if you want to create your own IQ packet configuration using the items that you currently have selected in IQ Packet contents list.
This is only available if Saved settings is set to one of your own IQ packet configurations and not one of the configurations supplied by Gladiator Forensics. Click to open a dialog box and edit the name you want used for the selected IQ packet configuration.
This is only available if Saved settings is set to one of your own IQ packet configurations and not one of the configurations supplied by Gladiator Forensics. Click to open a dialog box and confirm the deletion of the selected IQ packet configuration.
Click to return to the Account settings screen.
Select which outputs you want included in the IQ packet. For further information refer to Understanding each IQ packet.

Click to open the Calls by hour settings dialog box.
By default calls without a matching tower location are included in the Calls by hour analysis. Clear this setting if you only want calls with matching tower locations included in the Calls by hour analysis.
Click to open the Common IP settings dialog box.
Enter the number of results you want included in the analysis.
Click to open the Common locations settings dialog box.
Select if you want to include all the common location maps in your IQ packet.
Select if you want to include all the common location calls in your IQ packet.
Set the time interval you want to use for the analysis.
Set the maximum distance apart that cells or geo-location events can be for them to be included as being in the same area for the analysis.
Click to open the Common Numbers settings dialog box.
Enter the number of results you want included in the analysis.
Select to to hide the associate names which provides privacy to the associate if you need to share the analysis details with others.
Select to exclude shorter numbers that are likely not to be of interest to you such as SMS or voice call from the operator, and ATM bank transactions.
Select to include the country code in the results.
Click to open the First/Last Sectors settings dialog box.
Enter the number of results you want included in the analysis.
Click to open the Frequent IP settings dialog box.
Enter the number of results you want included in the analysis.
Click to open the Frequent Locations settings dialog box.
Set the time interval you want to use for the analysis.
Set the maximum distance apart that cells or geo-location events can be for them to be included as being in the same area for the analysis.
Enter the bin size of the area you want to use for the geo-location analysis. Each grid OSS-ESPA creates is named "GL<n>" and this is used to group the results in the IQ packet.
Enter the number of results you want included in the analysis.
Click to open the Frequent Numbers settings dialog box.
Enter the number of results you want included in the analysis.
Select if you only want names you have authorized included in the analysis. You can change the authorization of these names using  on either the Public records tab on the People and devices screen, or the Public records tab on the ESPA analysis center.
Select to to hide the associate names which provides privacy to the associate if you need to share the analysis details with others.
Select to exclude shorter numbers that are likely not to be of interest to you such as SMS or voice call from the operator, and ATM bank transactions.
Select to exclude phones which your administrator has set with a type/category that they identified as not being of interest in your analyses, for example phones on the white list. This means that the phones listed are focused on those which are of most interested to you.
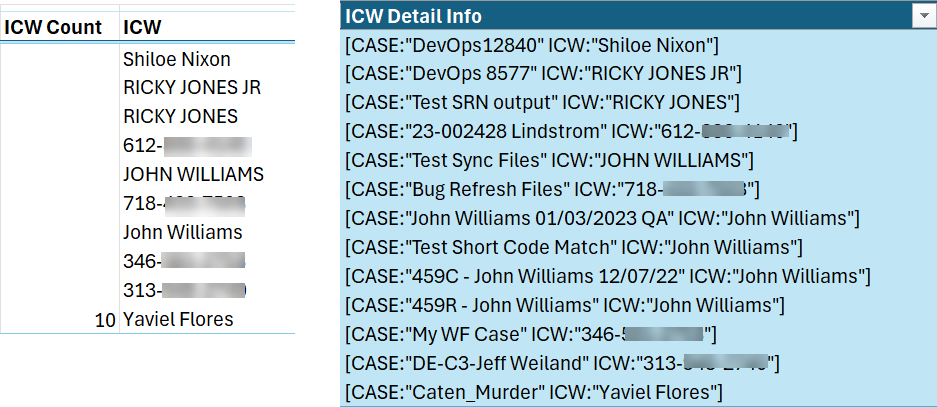
Select if you want to include all the targets in your OSS-ESPA account that the frequent numbers were in contact with (ICW). If you select this then:
-
ICW Count and ICW columns are included on the Frequent numbers tab of the Excel output, displaying the number of other targets the frequent number was in contact with and the target names respectively.
-
an ICW Detail Info column is included on the Associate_Info tab of the Excel output, which details the case names and the target names.
Select to include the country code in the results.
Click to open the Frequent Sectors settings dialog box.
Enter the number of results you want included in the analysis.
Click to open the Idle Sectors settings dialog box.
Enter the number of hours you want to define as the idle time before the result is included in the analysis. For example, if you enter 4 hours then only when there has been no phone activity for 4 hours while the phone is in the same sector will the result be displayed in the analysis.
Enter the number of results you want included in the analysis.
Click to open the Live target summary settings dialog box.
Select to include the PRTT/T3 intercept event data in the report. You can then additionally select to include HI2 and HI3 data. If you choose not to select HI2 and HI3 then only events without the content or messages are included in the report.
Select to include the HI2 signaling in the report. This is referred to as the Intercept Related Information (IRI) and is the pen register data.
Select to include the HI3 call content in the report. This is referred to as the Contents of Communications (CC) and is the wiretap content.
Select to include the GPS ping information, which was sent by the operator, in the report.
Select to include the social media ping information, sent be the operator, in the report.
Select to include the Google Earth files in the report. This produces an easy to view Google Earth output of the location information.
Select to include the historical CDR information in the report.
Select whether or not to include the HO and TA data session information. Not including it reduces the amount of data significantly, resulting in the report completing more quickly, however by default it is selected.
This setting is only applicable if you have a wiretap intercept in place; it is not applicable to PRTT or non-monitoring cases.
Select to include the synopsis in the report.
This setting is only applicable if you have a wiretap intercept in place; it is not applicable to PRTT or non-monitoring cases.
Select to include the transcript in the report. If your account has the optional E27 AI server, then this transcript may have been generated using AI.
This setting is only applicable if you have a wiretap intercept in place; it is not applicable to PRTT or non-monitoring cases.
Select to include the notes in the report.
Select to include the tags in the report.
Select to include the warrant dates in the report.
Select whether or not to include the GPS ping email's HTML. Not including it reduces the amount of data significantly, resulting in the report completing more quickly, however by default it is selected.
Select to filter the IQ packet report details based on any filters you have available on your Evidence Management and Reporting screen. This includes any filters you have saved, and any global filters saved by your monitoring supervisor or administrator.
Select what you want included in the report:
-
One report per case

-
One report per person

-
One report per target phone

Click to open the Location with common location-time settings dialog box.
Set the time interval you want to use in your IQ packet.
Set the maximum distance apart that cells or geo-location events can be for them to be included as being in the same area in your IQ packet.
Click to open the Location with Person's Device settings dialog box.
Select if you want to include all the location with person's device calls in your IQ packet.
Enter the number of results you want included in the analysis.
Click to open the Person's Device at Location settings dialog box.
Select if you want to include all the person's device at location calls in your IQ packet.
Enter the number of results you want included in the analysis.
Click to open the Sector by hour settings dialog box.
Enter the number of results you want included in the analysis.
Select which types of calls you want included in the analysis.
Click to open the Sector by hour settings dialog box.
Use the check-boxes to select which data you want to download as a csv file.
-
Event summary which provides the data that is displayed on the Sentinel screen's Event summary view.
-
Location events which provides the data that is displayed on the Sentinel screen's Location events view.
-
IPs events which provides the data that is displayed on the Sentinel screen's IPs view.
-
Stats which provides a statistics file detailing a summary of the number of messages, calls, cell sites and GPS locations and their timings.
-
Messages which provides a raw messages download.
Click to open the Target development settings dialog box.
Select which analysis you want included in the IQ packet report. For target development cases, the default analysis is always available but there may be additional analyses if you created any using Save to case analysis on your filtered selection on the Target development preview tab of the Manage files screen. For further information refer to Creating and analyzing geofence and tower dump cases.
Click to open the Target summary settings dialog box.
Select if you want to include X-Case analysis data, that is, including analysis data from multiple cases. This means that OSS-ESPA will search for the target person in other cases and include the data in the IQ packet's Excel output. The additional data that is included is shown on the Excel output's Associates tab as shown below.
Select it if you want to include the IP activity and locations in the report. OSS-ESPA supports both ARIN lookups and the IP2 Location database file, so when it receives the IP data from the telecommunications provider for an CASEID (LIID) it compares the IP to either the IP2 Location data base file or performs an ARIN lookup and includes the results in this IQ packet.
Select to include in the Excel file the following additional information for an associate number:
-
X-Cases
-
Addresses
-
Accounts
-
Vehicles
-
Government IDs
Select to include the country code in the results.